
Snowspeeder Deconstructed.
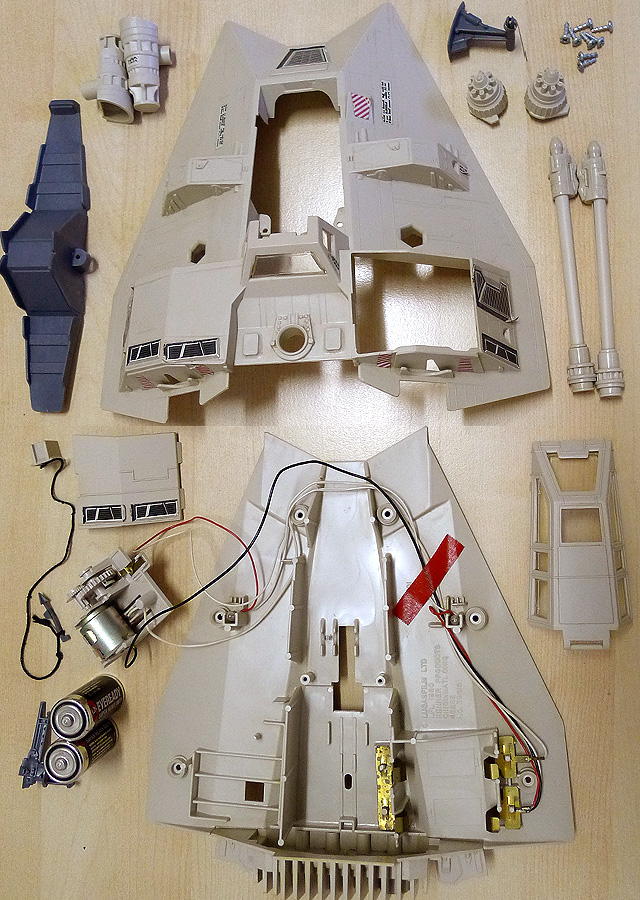
Snowspeeder Deconstructed. (Vintage Snowspeeder)
A few weeks back I had some spare time on a Friday morning so I decided to have a go at taking apart my vintage Snowspeeder in order that I might fix the electronics inside. I mean, it’s winter after all. Every self-respecting Snowspeeder owner should be able to shoot laser beams if the occasion calls for it.
As is often the case with taking apart old toys, the exercise turned out to be much more about cleaning than actually fixing. After I finished removing the dust and grime I couldn’t help but notice how beautiful the parts looked. Clean, yes, but more than that the disassembled lot of parts almost seemed to come alive. Decades-old secrets finally revealed.
So it goes without saying: if you collect this stuff and have ever thought about getting under the hood to see what’s inside, I say go for it. It’s a rewarding experience on many levels. And specifically if you want to pull apart your vintage Snowspeeder to fix the lights and sounds, chances are all you need to do is get down to the tiny motor and assist it in turning a few times while you hold down the button. Once it’s freed up a bit you’ll be amazed how quickly it returns to its original action.
Oh, one last thing. After I took this photo I noticed that one part did not make it into the frame. Are you Star Wars geek enough to know which part it is? Be the first to name it in the comments below and you just might win a cool prize. (One guess per person please.)
Would it be the rear gun?
The gun, harpoon, and harpoon string are all there in the lower left.
Where is the cockpit?
Cockpit canopy is there on the right. The seats are in upper left. And the perimeter of the cockpit is just made up of the plastic on the top part of the shell (upper part of frame).
Ok missed the seats. If this is the speeder that went with the action figures, weren’t there lights on the lasers? like a clear plastic tube that fit over the tan plastic? Perhaps I am thinking of a different version of the speeder.
The lights that you see when it’s all assembled are in clear tubes that are found within those long guns in the upper right of the photo. The guns are on their sides in the photo so you can’t see their tops which are open, revealing the transparent tubes. What’s neat is that in this photo you can actually see the small light bulbs that cast the light that lights up the transparent tubes. Looking from the top-down, they’re sitting in little “U” shaped protectors that are part of the bottom shell of the speeder. If you’re having a hard time spotting them, draw a line between the little motor on the left and the hinge part of the canopy on the right. That line basically passes right through them.
The only thing I could think of was some of the stickers are missing…….Was gonna say the action figure but it never came with any figures.
Technically stickers do constitute a ‘part’. But that’s not what we’re going for here.
hmmm … the sliding plate that would keep the skid up?
Ladies and gents we have our winner!
Nice!
Hi there,
I’m deconstructing my vintage snowspeeder myself over here to get the old sound and lights going, I just can’t seem to fix it. Do you have any suggestions? Is the motor supposed to be in the exact same position as it is on your picture? so the black wire goes in the slot and the motir has the 2 openings pointed up?
Thanks
Chris
And just FMI, what is supposed to happen when you press the button? As I can see it, it just lifts the motor slightly up. Is that it? Or am I missing something/a part?
Thanks again
Chris
Hi
Any idea where I can replacement bulbs for the snowspeeder and are they easy to rewire?
many thanks
Bob
I’m sorry Bob – the bulbs are one thing I haven’t taken on. But my guess is that if you choose to explore it, you’ll find the solution. These toys were made to assemble and (I’ve found) disassemble quite easily. Just takes some patience.